
In continuation to our efforts in improving usability, increasing engagement, increasing collection, reducing the operational efforts, and supporting acquisition and retention in the system, we have identified and rectified the following product gaps and also added certain valuable enhancements to the product.
New Dues Page – Phase 1
Dues page, being the most frequently visited page by the Society Accountant/Treasurer for recording payment / view account statements, required multiple clicks for day to day transactions, making it a cumbersome process. This is now simplified with the new Page bringing the account statement and payment and flat search in a single view.
Path : Dashboard>> Accounts>> Dues and receipts>> Dues
New Dues Report
Revamp on dues report by introducing new filters (such as FY) that can reduce difficulty in fetching required information, With a hyperlink under the “House” tab redirecting to the flat’s dues page and another under the “Total Dues” tab redirecting to the “Current Dues Break Up”
Path : Dashboard>> Financial Reports>> Dues and Advance collection>> Dues Report
New ‘Custom Group’
As a part of improving the user experience, we have redesigned the ‘Groups’ section within the ‘Communications’ tab. The new UI presents a better segregation of customizable groups and removes the SMS group option.
Path : Dashboard>> Communications>> Groups
Prepaid – Recharge Status Verification Tool
Previously, in case of any failure of payment or pending status the admin had no single view to track and action these transactions. Now we have introduced a Pending Recharges Page along with Retry Recharge and mark as success buttons which can enable the admin to take action immediately without depending on MyGate. To support the admin further, a new daily balance graph has been introduced in case the admin needs validation on the actual status of recharge.
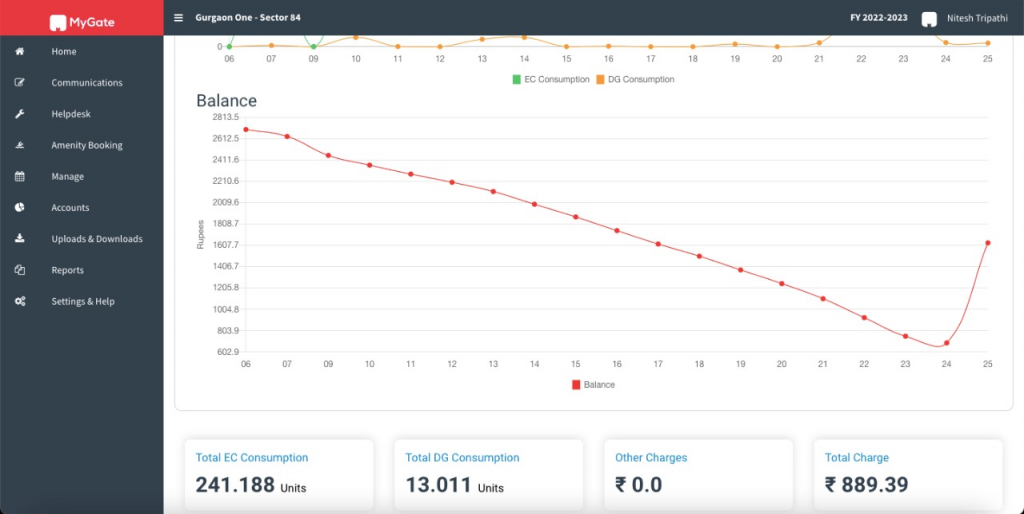
Path : Dashboard>>Accounts>> Utility Meter>> Meter Charges
New ‘Pay Later’ Option in ERP checkout
Adding to the existing list of payment methods, we have introduced the ‘Pay Later’ option. Users can use “Simpl” or “ICICI Paylater” through which they can avail credit for their invoice payments and payback in smaller values within subsequent few months.
Path : User App>> Community>> Society Dues>> Choose Invoice>> Make Payment>> Pay
Related Invoice Numbers now available in ‘Dues Collection’ report
Introduced Invoice Numbers column under the Collection report. This would provide more visibility to the accountants and managers to perform their analysis/segregation.
Path : Dashboard>> Financial Reports>> Dues and Advance collection>> Dues Collection
Owner Name-based search in house filters
Acknowledging the difficulty in searching for a unit in case of difficult building/house nomenclature, we have arrived with a name-based search option to ease the difficulty in finding an individual. This option is now available under Receipts, Batch ID and Billing details as well.
Path : Dashboard>> Accounts>> Dues and receipts>> Receipts
Path : Dashboard>> Accounts>> Billing Details
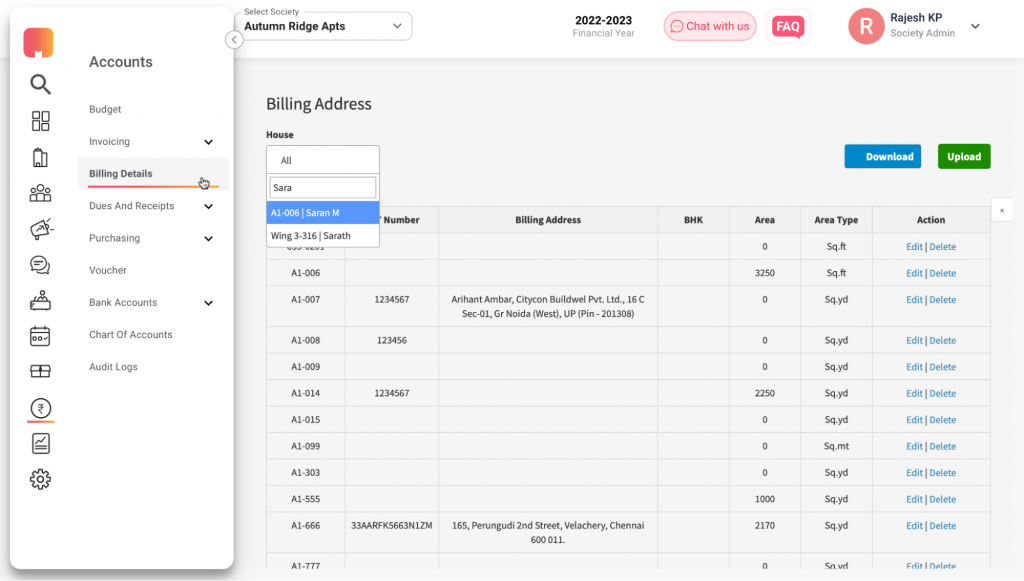
Path : Dashboard>> Accounts>> Invoicing >> Invoice history
Preferred TDS application in Vendor Advance Payment
Option to define the TDS charges against each of the vendors has been available under the “Vendor Master”. These predefined TDS settings will now automatically prefill the TDS rates under the “Pay advance” similar to previous implementation in “Book Expense”
Path : Dashboard>> People Hub >> Vendors>> Create Vendor>> Preferred TDS setting
Path: Dashboard>> Accounts>> Purchasing>> Book Expense>> Pay Advance
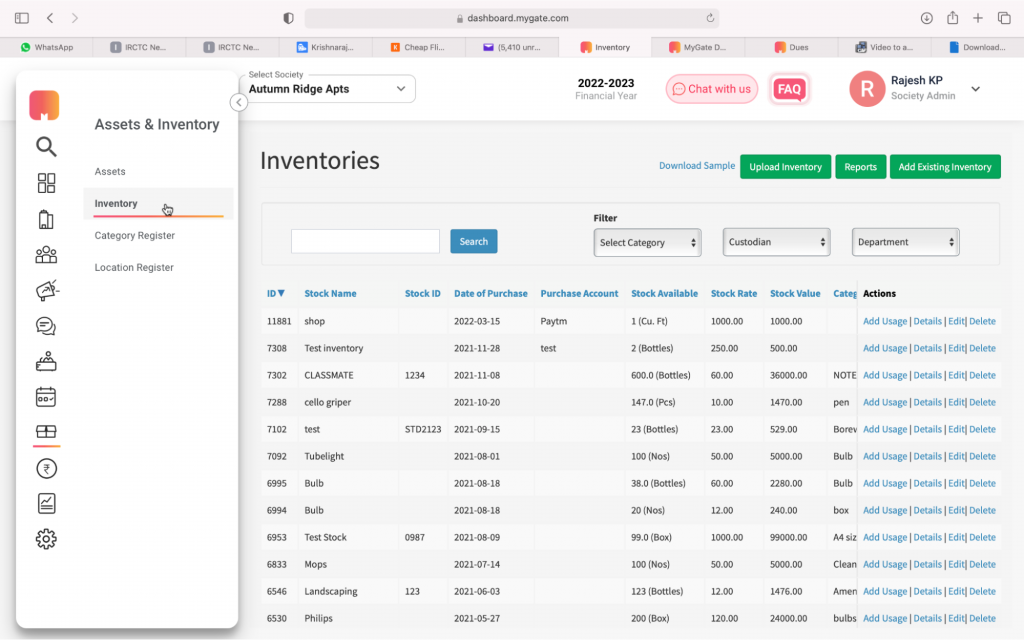
Inventory Statement rework
The Inventory Listing and Details pages have been re-organised to help the accountants or store managers gain clear visibility on stock availability and their consumption statement. The action column has been made non-scrollable to ease daily activity by the customers.
Path: Dashboard>> Asset and Inventory>> Inventory
Item Description in Batch ID Excel Export
The relevant item description is now available in the subsequent column for each of the charge items. This can be viewed in the Excel download under the Invoice history against the Batch ID.
Path: Dashboard>> Accounts>> Invoicing >> Invoice History>> Batch ID
Meter based upload to reflect the Sum of Amounts under Change Reading
The Change Reading under the “Config amount” previously did not showcase the total amount. With the current update, the invoice template shows the summation of the “Config amount” above the “Change Reading” in the template.
Path: Dashboard>> Accounts>> Invoicing>> Member Invoices>> Invoice Template
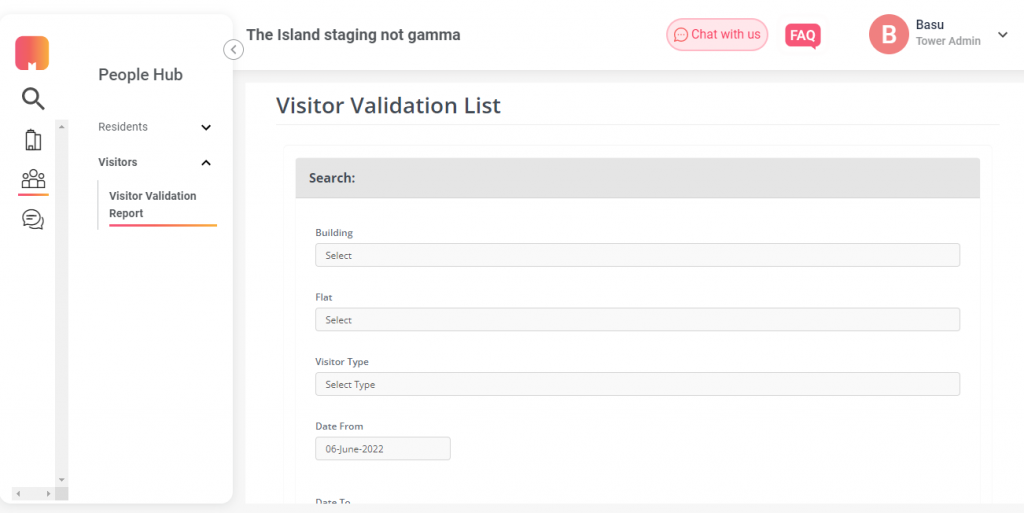
Tower Level Admin (for child societies)
With the increasing adoption of umbrella societies, it was found that the tower level admins would need access to more modules and hence have improved the experience of tower level admins by giving access to the relevant information needed by the admin. Following are the list of items we have provided access to the tower level admin.
- Building List
- Flat List
- Resident List
- Generated Reports
- Visitor Validation Report

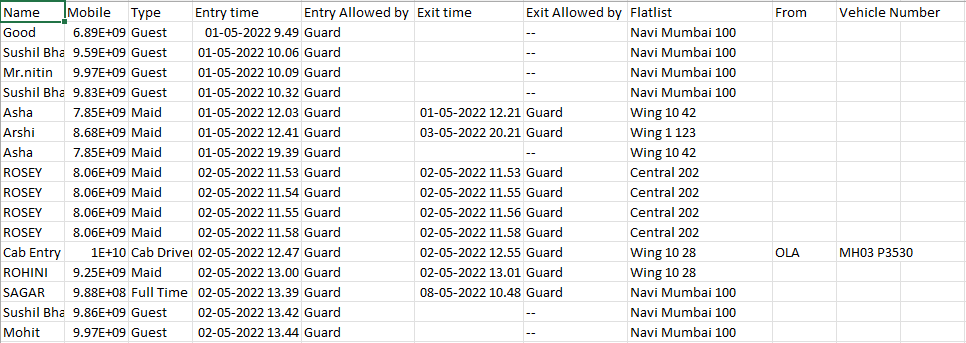
Monthly Entry-Exit report Improvements
Based on feedback from Society Admins, we have added a few more fields in the downloaded report for the admins to verify the details from the same report. Following are the list of fields added in the Monthly Entry-Exit report.
- Entry Allowed By
- Exit Allowed By
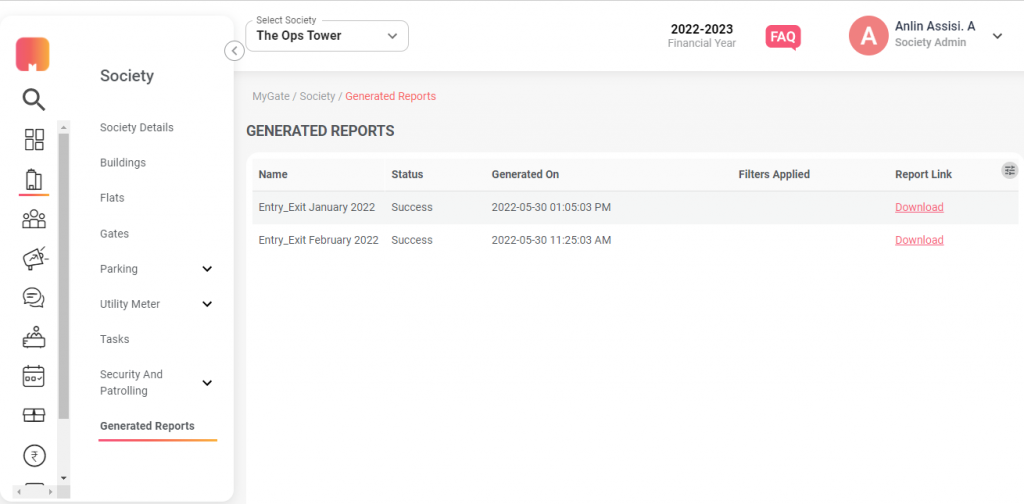
To prevent download failure, incomplete download and to address security vulnerability of monthly entry-exit data stored in the archive, we have made the report download happen in real-time by sending the reports over mail and also showing them under ‘Generated Reports’. This will solve the missing data issue and timeout errors during download.
Path: Unified Dashboard >> Society >> Generated Reports
Refined Home Page for Society Dashboard
- In order to give the ability to the admins to choose on the widgets based on their priority we have introduced the customisation ability for widgets where the admins can drag and place a widget as per their priority and convenience.
- Society Level widget configuration for the admins who have access to multiple societies.
- Expand and collapse of the Menu tab in the Unified Dashboard
Additional Notes :
- Bank Reconciliation Report page String Change
- Dues Report – Download PDF Implementation & Detailed Page
- Dues Report Revamp – (Improvements & Separation of Ageing) Task
- House Name to appear as Payee Name in web-payments
One of the most disturbing things for a homeowner to discover is small piles of wood dust underneath furniture. Those piles of wood are a telltale sign of the presence of one of the most destructive pests in Indian homes: termites!
Know your enemy
There are two types of termites commonly found, and knowing which one you’re dealing with will make remediation that much easier.
Subterranean termites prefer living in moist conditions and can be found both in wood and in the soil. These are termites you are likely to find living under homes with wooden foundations, feasting on the wood.
Drywood termites are their more dangerous cousins. These pests do not need moist conditions, and, as their name suggests, build colonies in dry wood wherever they can find it. These are the critters you will find in your furniture, in wooden walls, and eaves.
There are two main reasons that make dealing with termites more difficult than dealing with regular pests. The first is that, due to their size, spotting termites in your home is close to impossible. And the second is that by the time you see telltale signs of their presence, a lot of the damage would have already been done.
In this short read, let’s discuss some top tips for preventing an infestation and how to get rid of termites if the infestation is inevitable.
Recognizing their presence
We all know that small piles of wood dust underneath furniture are indicative of the presence of termites. However, here are some other signs that confirm that you have a termite problem.
- Termite droppings and/or wings in the area surrounding wooden furniture.
- Holes in the woodwork that fall through when pushed against with a sharp object.
- Mud tube formations on the walls of the house.
While the first two indicate the presence of dry wood termites, the third one is a sign of subterranean ones.
Preventive measures
“Prevention is better than cure,” as the old adage goes. Let’s take a look at what you can do to prevent a termite infestation.
Aloe vera provides natural protection against termites. Apply aloe vera gel to your wooden furniture periodically, especially before the onset of the monsoons.A mixture of four parts water to one part white vinegar also works efficiently in keeping termites at bay.Get your wood treated with Borate before you build your furniture. Borate or borax powder is very effective against termites.Moisture is very essential for subterranean termites to thrive. This can be avoided altogether if you keep your home as moisture-free as possible.
Those who live in humid areas would do well to invest in a dehumidifier. Your air conditioner can also help in keeping your home cool and control moisture in the air during the summer.Subterranean termites gain access to your home’s foundation through the soil. This makes having your door open out into the garden a terrible idea.
Experts advise that to avoid an infestation of subterranean termites, maintaining a minimum distance of 18 inches between your home and where your garden begins is essential.The best way to stay on top of possible termite invasions and to mitigate the amount of damage caused is to have a periodic pest inspection done by qualified professionals.
That way, you not only have better chances of finding out about the infestation before it completely destroys your wooden furniture, you also have expert advice on the best ways to rid yourself of these pests. Anti-termite treatments
While we’ve looked at options to prevent a termite infestation, knowing how to kill the termites in your home is also of paramount importance. Let’s now take a look at some effective anti-termite treatment options.
1. Make use of sunlight
Termites thrive in dark and cool environments. Pick up all your infected furniture and put it out in the summer sun for two or three days at a stretch.
Not only will the termites be killed by the heat, but the sunlight will also dry up all the extra moisture from your furniture.
2. Cardboard box traps
Cardboard makes the perfect termite trap. Since it is primarily made of cellulose and has a woody smell to it, termites find cardboard irresistible.
All you need to do is wet cardboard boxes a little with water to make the smell even more tantalizing and leave those boxes near your termite-infested furniture.
Within a few hours, you will find termites thronging in the open cardboard box, and you can burn the box to rid your home of the termites.
3. Boric acid spray
Boric acid is a non-toxic combination of water and borax powder which is known to be effective in killing termites.
Make a solution of borax powder and water. Fill this solution into a spray bottle for ease of use. Then, spray it on the wooden furniture.
While it may take a few applications for the termites in your home to disappear altogether, the method is nonetheless effective. For increased efficacy and a quicker turnaround time, you could try pairing this method with the cardboard box traps.
4. Natural oil treatments
Orange oil contains a compound called d-limonene which kills termites as soon as they come into contact with it.
Neem oil, on the other hand, kills termites when it is ingested by them. Spray either of these natural oils on the infected surfaces repeatedly to achieve the best results.
5. Natural-born killers
This may sound a little bizarre, but it turns out that certain worms are very effective in stopping the spread of termites.
Parasitic nematodes are small worms that burrow into and kill termite larvae in two days. These worms are available on online marketplaces, and you may even be able to source them from your local nursery.
About MyGate
MyGate is India’s largest apartment management software, benefiting thousands of housing societies, developers, society facility managers, and millions of homeowners in every Indian city.
Home ServicesThe influence and benefits of technology on our lives today cannot be overstated. The twenty-first century is widely regarded as the century of inventions and technologies, as they have pervaded our daily lives and improved them. It is the process of making things, tasks, and activities easier to complete with maximum efficiency. Tasks that used to take a lot of effort and time can now be completed with a few taps on a smartphone. However, not everyone knows how to use it, so they may end up asking friends, relatives, and co-workers to help them perform tasks like booking a cab. In this article, we’ll go over a step-by-step guide to ‘How to book a cab online?’ as well as some advantages of booking cabs online.
Online cab booking
Booking a cab used to be a difficult procedure that included calling various tour and travel companies. Even though the internet was available, you had to look out the contact information for a cab service in the area you were visiting to make your reservations. The majority of travel companies did not have their own booking websites where you could contact them and book a cab to the airport and other places. However, in the last few years, things have drastically shifted as technology entered our life. There are numerous online cabs booking services like Ola and Uber available today that offer services like airport cab booking through the phone application, and are entirely secure to use at any time.
These online cab booking services are less expensive and send trustworthy drivers that have all the necessary information to pick up customers, ensuring that you get to your location safely. Now that we’ve covered the fundamentals of online cab bookings, let’s look at the benefits of online cabs bookings over offline cabs.
How to book a cab online?
You no longer need to tell someone to “book a cab for me,” because our step-by-step online cab booking tutorial will walk you through the process to book a cab to the airport and other destinations. So, go through the “How to book a cab online” guide.
- Download the online cab booking app from the Google Play Store or the Apple App Store.
- Complete your profile and verify your phone number by entering the OTP.
- After you’ve completed your profile, you may book a cab to the airport or other destinations online by granting the app access to your location or manually typing the pickup address.
- The next step is to choose a destination, after which you can choose from a variety of automobile alternatives, each with a projected price and arrival time.
- Select your preferred car and make your payment online or choose the cash payment option.
- Once you’ve connected with a cab driver, the app will display the cab driver’s information, including current location, estimated arrival time, cost, and rating.
- The route map, which refreshes as the cab drives, is also available for the users.
- Give the OTP to the driver when the cab arrives at the location and start the drive to your destination.
Advantages of online cab booking
There are various benefits of pre-booking cabs using online applications and websites, a few of which have been discussed below:
Saves time
Online cab bookings save you a lot of time that would otherwise be spent on the road looking for a cab. Furthermore, there are fewer odds that you will find a taxi on the road, and even if you do, there are even fewer chances that you will be willing to take it to your desired location. Online cab booking applications connect you with expert cab drivers that pick you up and drop you off at your desired place on time. If you need to go to the airport, for example, an airport cab booking service allows you to pre-book a cab so that you can be there on time for your trip.
Comparatively cheaper
A lot of tourists need cabs to visit the place, but are unknown about the appropriate cab prices in the market and end up getting looted. Online cab booking applications like Ola have a fixed fare charge that is shown prior to the trip, allowing you to book the cab at a comparatively cheaper price.
Special offers
The best thing about online cab booking apps is that they frequently provide special discount offers to users, allowing you to order a cab at a very low cost. If you want to book a cab to the airport, for example, seek specific airport discount offers that are available to frequent and new users.
Cab details
Unlike traditional cab bookings, where the cab driver is unknown, and you don’t even have the cab specifics, Ola and Uber give you the cab driver’s and car’s information ahead of time. Users can also share these facts with their friends and family, making the journey even safer.
Easy payment options
India is currently experiencing a surge of digitization, with many people carrying very little cash and preferring to use cards, online payment options, and other methods. Due to the dearth of online payment alternatives, a traditional cab driver may only accept cash payment, while online cab booking apps accept the majority of online payment choices, allowing you to participate in the digitized India.
Easy interface
You don’t even need to rely on people asking them to help book a cab for me, because the apps’ user interface is designed with everyone in mind. These applications support a variety of Indian languages and offer a simple cab booking page, the steps for which are outlined further down in the guide.
Safety
Everyone’s first priority is to book a safe cab, and online cab booking apps recognize this value and thus share cab details, have a special SOS button that shares your location with pre-selected people, allow you to give feedback to the cab drivermy and assist other passengers in making a decision, and use GPS mapping. To make the cab booking even more safe, you can install the MyGate Apartment Security system that makes sure that only approved cab drivers enter the residence to pick you up after a thorough security check.
Conclusion
Booking a cab online is a simple operation with numerous advantages, so read the “How to book a cab online” article and reserve the cab without relying on anybody else. To make the ride safer, share the cab information with friends or family members, as well as the cab’s current location. Also, use MyGate Apartment Security to allow only approved cab drivers to enter the residence.
Home ServicesThe coronavirus pandemic, which shook the world at its advent two years ago, baffled the medical fraternity all over the world. It was an unprecedented medical crisis that created stress and anxiety as doctors grappled with insufficient resources to understand the infection and how to deal with it.
Fortunately, researchers developed certain tests to detect the virus and find ways to reduce its spread. These tests have played a crucial role in understanding how the virus gets transmitted. They help in detecting patients who have Covid-19 or had it in the past. These tests also help in suggesting the appropriate treatment to help save lives and control the transmission of the virus.
There are many questions about these Covid-19 tests: what are the different types of tests, when should one get tested, what is the procedure of the tests, and how much time does the RT-PCR test take.
Here you can find all this information and more about Covid-19, the tests needed to detect the virus, how much time the RT-PCR test takes, and what to do while you wait for the results.
Types of Covid-19 tests
There are three types of coronavirus tests:
- RT-PCR tests
- Antigen tests
- Antibody tests
RT-PCR test
RT-PCR or Reverse Transcription-Polymerase Chain Reaction is one of the most common and accurate techniques for detecting the Covid-19 virus. This test is considered the ‘gold standard’ of testing, as it perfectly identifies a positive test if it is conducted within five days of showing the symptoms.
For this test, a sample is collected from the person’s nose or/and throat, which are places where the virus usually accumulates. The sample is then treated with chemical solutions to extract the RNA of the patient and the virus, if it is present.
However, the effectiveness of this test decreases to 70% if done later, between 9 and 11 days, and by the 21st day, it drops to 30%.
Antigen test
Antigen tests are also called serological tests and are used to detect proteins or antigens that are specific to the coronavirus.
Compared to the RT-PCR test, this test has a higher risk of a false-negative, which means the virus may be present in your body, but the test may not show it. The test might also report a false negative if the virus is present in very low amounts.
Antigen tests are called rapid tests, as some clinics provide the results in just 15 minutes.
Antibody test
Our immune system creates antibodies to fight the bacteria or virus that attacks our body. These antibodies are created within a few days or weeks after being infected and are unique to the kind of virus the immune system is responding to.
An antibody test cannot be used to detect a present infection. It only detects any previous infection. This test is done by collecting a blood sample through a finger prick and sent to the laboratory for detecting antibodies specific to the Covid-19 virus.
Some clinics give you the results on the same day, while some other clinics may take three to five days.
Who should get tested?
As per the Centre for Disease Control (CDC), the following people should get tested for Covid-19:
- People who display Covid-19 symptoms (cough, fever, loss of taste and smell, fatigue)
- People who have been within 6 feet of a patient suffering from Covid-19
- Those who have been referred by a doctor
- Those who may have attended a large indoor gathering that could expose them to the risks of contracting the infection
- People traveling to countries that require a negative RT-PCR test within 48 to 72 hours of their arrival.
Where should you get tested?
You can get tested at a private clinic, a government healthcare facility, or a laboratory. Several labs also conduct home visits to collect the samples.
What to expect during coronavirus testing
RT-PCR test procedure
For the RT-PCR test, a six-inch-long swab is inserted into the nostril or the back of your throat to collect a mucus sample. The swab is then rotated for a few seconds. The same procedure could be followed for the other nostril. You may feel slight discomfort during the test, but it lasts for just a few seconds.
The swab is then sealed in a sterile container and sent to the laboratory for testing.
Antigen test procedure
Similar to the RT-PCR test procedure, the antigen test requires a sample of mucus. A long swab is inserted into the nostrils and rotated for a few seconds. The swab is then sealed in a container and sent to the lab for testing.
During this test, too, you may feel slight discomfort for a few seconds.
Antibody test procedure
The procedure for the antibody test is different from the RT-PCR and antigen test.
In this test, the lab technician sterilises and pricks a finger for the blood sample. The blood sample is collected and sealed in a container, and then sent for lab testing.
What you should do while waiting for the test results
If you have done the RT-PCR test because you have been exposed to the virus and have been showing the symptoms, you should assume you have been infected and take the necessary steps to avoid spreading it to the people around you. You should self-isolate until you get your results.
However, if you have done the testing for travel purposes, have not come into contact with people having Covid-19, or are not showing the symptoms, then there is no need to self-isolate.
How much time does the RT-PCR test take?
Regular RT-PCR test
A regular RT-PCR test will give you the result within five hours. However, as there are different tests for Covid-19, every test takes its own time to come up with the results. It depends upon the kind of test and the laboratory or the hospital where you have done the test.
Rapid antigen test
Antigen tests give the results within 15 minutes. During these tests, too, a swab is inserted into the nose or the throat to collect a sample of the mucus. However, in this test, the sample is not sent to a laboratory. The sample is applied to a strip. The strip changes color if you test positive.
These tests are inexpensive and convenient as people know sooner if they are infected and if they need to self-isolate. Rapid tests are usually conducted before entering a healthcare facility or other public settings. Furthermore, as the antigen tests do not require a laboratory, these can be conducted at home.
The disadvantage of the antigen tests is that they are not as accurate as other lab tests and risk giving a false negative result.
What you should do if you have contracted Covid-19
If you think you may have contracted Covid-19, or if you have mild symptoms of the infection, follow these self-care steps to stay safe and to ensure the safety of others around you:
- Self-isolate in a well-ventilated room.
- Use a triple-layer mask and change it every 8 hours or if it becomes wet and soiled.
- Take ample rest and stay well-hydrated.
- Wash your hands frequently for at least 40 seconds or clean with a hand sanitiser.
- Do not share personal items with other members of your family.
- Clean every surface of your room that you may have touched.
- Monitor your temperature.
- Monitor your oxygen saturation with a pulse oximeter.
- Consult your physician if you notice any changes in your symptoms.
Here are some instructions for the caregiver:
- The caregiver should wear a triple-layered mask, especially when entering the patient’s room
- Maintain strict hand hygiene after visiting the patient’s room
- Avoid exposure to the oral or respiratory secretions of the patient while in their room or while helping them
- Sanitise your hands or dispose of the gloves after using for caregiving purposes.
Conclusion
There are different tests available for detecting Covid-19, and every test takes a different time to give the results. The time for RT-PCR depends upon where you get the test done. Some tests give the results within minutes, while some tests take a few days.
RT-PCR tests are preferred because of their accuracy. Antibody tests detect if you have had the coronavirus earlier, and antigen tests give a quicker result but have a greater chance of a false negative result.
If you are detected with Covid-19, it is essential that you self-isolate, follow sanitisation rules, stay well-hydrated, and follow your doctor’s instructions.
About MyGate
MyGate is India’s largest society management system, benefiting thousands of housing societies, developers, society facility managers, and millions of homeowners in every Indian city.
COVID
Bathroom taps are probably the most commonly used water taps and also the most ignored ones. If they are clean or freshly installed, they tend to uplift the overall appearance of your bathroom. If not, you would feel like you are in a zombie movie set.
A clean water tap, if ignored, also gets dirty with time and develops a stubborn coating as a result of prolonged use. People would know this, especially the young professionals who do not have time to do a deep cleaning, as they are too much sucked into work. After a while, those bathroom taps start looking ugly and hard to ignore. That is when you know it is about time for water taps cleaning.
Why do taps get dirty?
If your bathroom taps look dirty, consider these reasons while you wonder how to clean water taps.
Hard water stains – if the quality of water reaching your household is hard, i.e., high in minerals and salts, these minerals start to accumulate on your bathroom taps. And to add to that, if you use hot water, the steam from the water containing those salts and minerals tends to settle on other areas of the tap.
Limescale deposits – With time, one would notice a hard chalk-like substance deposited over the tap filters around it. That is calcium carbonate and other salts that may often slow down the water flow of your taps due to heavy accumulation.
Dirt and grime – More often than not, we tend to touch the knob of our bathroom taps with oily or dirty hands. This results in the deposit of dirt, especially on the knobs. It is essential to clean it while you are on tap cleaning.
How to clean water taps?
Let’s find out how to clean taps in your bathroom and remove those stains that are bringing down the overall aesthetics of your bathroom.
But before you start learning how to clean steel taps, make sure you have these tools handy for the work. Don’t worry, they are not industrial tools, but ones you will easily find in your house. We recommend:
- An old toothbrush
- A dishwashing sponge with a hard scouring surface
- A microfiber cloth
- A spray bottle
For water tap cleaning, here are the ingredients that you would require. Don’t worry; you won’t need to run to the market again. You would find them right in your kitchen:
- White vinegar or lime
- Baking Soda
- Salt
- Dishwashing liquid
Simple, right?
Now let’s dive into what exactly needs to be done for water taps cleaning:
1. How to clean water taps with white vinegar or lime?
Step 1: Take equal quantities of water and white vinegar in a spray and shake the bottle to mix the components. If you do not have vinegar, you can use lime juice. This method is very effective if you struggle with limescale deposits on your taps.
Next, spray evenly on the surface of your bathroom taps and let it rest for 30 minutes to an hour for the acidity of these ingredients to act upon the tough stains or limescale deposits. Clean it with a microfiber cloth.
2. Water taps cleaning with dishwashing liquid
If the stains do not go entirely with vinegar or lime, what you can do is mix a few drops of dishwashing liquid in a bowl of lukewarm water and soak a dishwashing sponge with a hard scouring surface and scrub the dirty parts of the tap. You may require the old toothbrush we mentioned earlier to get to the corners and hard-to-reach spots. Next, rinse the tap thoroughly with lukewarm water and dry with a towel or tissue paper.
3. Clean water tap with baking soda
Baking soda helps remove the grime deposits on your taps due to its alkaline nature. All you need to do is mix 3-4 tablespoons of baking soda with 250 ml of water and apply the paste-like mixture to the bathroom taps. Make sure you give it a couple of hours at best to sit through and act on the stained surface.
Next, scrub the tap using a scrubber or a sponge with a hard scouring surface and a toothbrush to clean hard-to-reach spots. Clean it with water to see the stains disappear, making way to a sparkling clean water tap.
4. How to clean taps with salt?
Pour salt over the affected areas of the tap and let it sit for a few hours. This allows the salt to break down deposits due to hard water and also helps remove germs. Next, scrub it using a scrubber and rinse the taps thoroughly with lukewarm water to get clean, shiny taps.
To keep your taps in top shape is a task. That is why it is essential to do it frequently, as it saves the energy otherwise wasted in water tap cleaning after a long time.
There are many reasons to keep your bathroom clean. A dirty bathroom is a breeding ground for bacteria and germs. These can cause skin infections and other health problems. Additionally, a messy bathroom can be unsightly and embarrassing.
Cleaning the toilet can be challenging if the space is cluttered with toiletries, cosmetics, and cleaning supplies. By taking the time to clean your bathroom regularly and correctly, you can help protect your health and maintain a neat space. This article will discuss how to clean your bathroom with vinegar, one of the most effective natural cleansing agents.
You might be wondering why to clean a bathroom with vinegar. It is excellent for breaking down soap scum and hard water stains, making your bathroom sparkle in no time. These are just a few benefits of vinegar; up next, we have listed some more:
Benefits of cleaning your bathroom with vinegar
There are many reasons you should consider switching to vinegar from your regular bathroom cleaning chemicals. Here are some common ones:
- You can use vinegar to clean all surfaces in the bathroom, including the toilet, sink, countertops, shower and bathtub. Thus, it is very versatile, and you don’t need different types of cleaning agents for different surfaces.
- Vinegar can kill most bacteria or germs. It alters their chemical compositions and breaks down the proteins and fats that make up their cell structure.
- It is a natural deodorant and will eliminate any bad smells. This is an added advantage of using vinegar to clean. You also won’t need to invest in expensive bathroom air fresheners.
- It is an affordable alternative to other cleaners. You are likely to find it in your kitchen itself. Thus, you don’t have to spend anything over your regular utility budget.
- Vinegar is non-toxic. It is made from grapes or apples, so it is a natural product safe for use around the home. This is especially important for people with children or the elderly at home. With harmful chemical cleaners, they are more at risk of an accident. That is not the case with vinegar.
- It is environmentally friendly and biodegradable. Vinegar degrades easily, unlike chemicals that do not dissolve and accumulate in your drains. Thus, you will be contributing to the environment by switching to vinegar.
- Taps are steel, which isn’t a metal you can clean very easily. If you use harsh chemicals, it will blacken the steel surface permanently. But vinegar is a strong natural cleaning agent that does the job very well without harming the surface. It can easily remove white water residual on tap, leaving them as good as new. It can also kill bacteria and germs that may be lurking on the taps.
How to make cleaning solutions with vinegar
Vinegar needs to be mixed with different substances to form a cleaning solution for different surfaces. A 50:50 mixture of vinegar and waterworks for most surfaces. But places like tubs, tiles, and toilets require you to mix it with baking soda or another strong alkali. Mixing vinegar with salt can help clean glass stains. You can also add acids like a spirit or lemon juice to clean hard surfaces like shower panels. If you want to remove bad odour, you can add a few drops of essential oils or fragrances to the mix.
Cleaning bathroom with vinegar: a guide
A bathroom has several places which need regular cleaning. Things like taps, showers, tiles, and drains are used frequently. That’s why they easily accumulate dust, grime, and bacteria. Let’s learn how to clean the bathroom with vinegar in different ways.
1. How to clean bathroom taps with vinegar
Vinegar works well with steel taps and knobs because of its soft cleaning nature. Here’s how you can use it to clean taps in your bathroom:
- Pour some vinegar into a bowl. Do not dilute it with water.
- Soak a cloth in the vinegar and then wring it out to not be too wet. A microfiber cloth is preferred for this job.
- Now gently wipe the taps with the vinegar-soaked cloth. Apply pressure where you see more build-up of grime or stains.
- Now buff the taps with a dry cloth to give them a shine.
2. How to clean bathroom floor with vinegar
- Bathroom floor is used frequently and carries all kinds of germs and stains. Learn how to keep your bathroom floor shining with vinegar:
- Pour vinegar into a bucket.
- Dip a mop into the vinegar and wring it.
- Mop the floor, making sure you reach all the dirt and grime.
- Rinse the floor with water and dry it off with a towel or clean cloth.
3. How to clean bathroom tiles with vinegar
Tiles can be one of the hardest surfaces in the bathroom to clean. The dirt accumulated in the joints of tiles can’t be scrubbed off easily with regular cleaners. Here’s how to clean your tiles properly with vinegar:
- Pour enough vinegar onto the tile floor to get it drenched.
- Use a brush or mop to scrub the tile and grout lines. This will create tension between the floor and the grime. And it will detach itself from the tile.
- Let the vinegar sit on the tile for a few minutes to break down the rest of the grime.
- Rinse the tile with water and dry it off with a clean cloth or towel.
- Repeat as you find it necessary.
4. How to clean showerhead with vinegar
Your showerhead might be dotted with water stains and mould if left unattended. Vinegar can help remove these stains and keep the showerhead clean. Here’s how:
- Carefully remove the shower from the hose.
- Now take a plastic bag and pour vinegar to fill half of it.
- Take the showerhead, gently place it in the bag, and tie it up. Let it sit overnight.
- The next morning, re-attach the showerhead to the hose and run the shower for 5-10 minutes. The shower will get cleaned, and any bad odour will also vanish.
5. How to clean bathroom mirror with vinegar
Water streaks and stains on mirrors are very persistent and equally annoying. Here’s how to clean your bathroom mirror with vinegar:
- Take an empty spray bottle and mix vinegar and water in it in a 50:50 ratio.
- Spray the solution on the mirror and gently wipe it clean.
- Now use a cloth soaked in water to remove the vinegar solution
- Now wipe clean with a dry cotton cloth.
This process may take a little longer than using a commercial cleaner, but it’s worth it to know that you’re not exposing yourself and your family to any harmful chemicals. Vinegar is a natural and safe alternative that easily gets the job done. Be sure to rinse the tile well afterwards to remove any vinegar residue. For best results, use a vinegar solution that is diluted with water. Enjoy a clean and sparkling bathroom.
How to get rid of bathroom odours using vinegar
Bathroom odours are another nuisance that you might have to tackle. So here’s a step-by-step guide on how to remove bathroom odours with vinegar:
- To get rid of bathroom odours with vinegar, start pouring vinegar into a bowl.
- Place the bowl in the bathroom. The vinegar will absorb the odours. Alternatively, you can pour vinegar into a spray bottle and spritz it in the toilet after each use.
- Let the bowl sit in the bathroom overnight. Vinegar is a natural deodorizer that will leave your bathroom smelling fresh and clean. Give it a try!
- Remember to always wipe down surfaces after using the bathroom. This will help prevent dirt and grime from building up over time. After each use, wipe down the toilet, sink, and countertop, and sweep or mop the floor as needed.
Removing the odour is important while learning how to clean the bathroom with vinegar.
Cons of cleaning bathroom with vinegar
Although vinegar is an excellent cleaning agent, there are some cons you must consider before you switch to vinegar. This is good to know as you learn how to clean the bathroom with vinegar. One potential disadvantage of using vinegar is that it can be challenging to remove all vinegar residues once the cleaning is complete. Additionally, vinegar can be acidic and cause damage to the tiles over time if used frequently. Lastly, vinegar can be smelly, so it may not be a desirable option for those who don’t like the smell of vinegar. It may give you a feeling of nausea. However, you can counter this con by mixing vinegar with natural ingredients like lemon.
Things to consider while learning how to clean the bathroom with vinegar
As with any chemical cleaner, we should take precautions when using vinegar in the bathroom. The cautions which we need to take while cleaning the bathroom with vinegar are:
- We should avoid using vinegar on marble surfaces, as it can etch the surface.
- Vinegar can also discolour some surfaces, so we should test it in a small, inconspicuous area before using it on main surfaces.
- We should never mix vinegar with bleach, which can create a dangerous gas.
- Vinegar is a strong acid and can cause skin irritation if it comes into contact with skin, so we should wear gloves when using it. We should also avoid getting it in our eyes.
- If we use vinegar to clean drains, we should make sure that the vinegar is diluted with water, as undiluted vinegar can be harmful to plants. We should also avoid using vinegar to clean toilets, as it can cause the bathroom to become discoloured.
- We should rinse the surfaces we have cleaned with vinegar well, as the vinegar can leave a residue behind.
It is essential to be aware of these cautions, as vinegar is a powerful cleaner and can cause damage if it is not used correctly. However, vinegar can be an effective and affordable way to clean surfaces in the bathroom when used correctly.
Final takeaway
The bathroom is one of the most-used rooms in the house. It’s also a place where grime and dirt can build up over time, making it difficult to keep clean. This is where vinegar comes in handy.
Vinegar is a natural disinfectant that can help kill bacteria and germs, making it an ideal cleaning agent for the bathroom. Not only is vinegar effective at removing dirt and grime, but it’s also affordable and environmentally friendly. So if you’re looking for a safe and effective way to clean your bathroom, consider using vinegar.
Even if you’ve learned how to clean the bathroom with vinegar, don’t be afraid to ask for help if needed. There’s no shame in admitting that you can’t do it all by yourself. Friends or family members may be happy to lend a hand from time to time, and with the help of vinegar, it will get so easy for any of you.